|
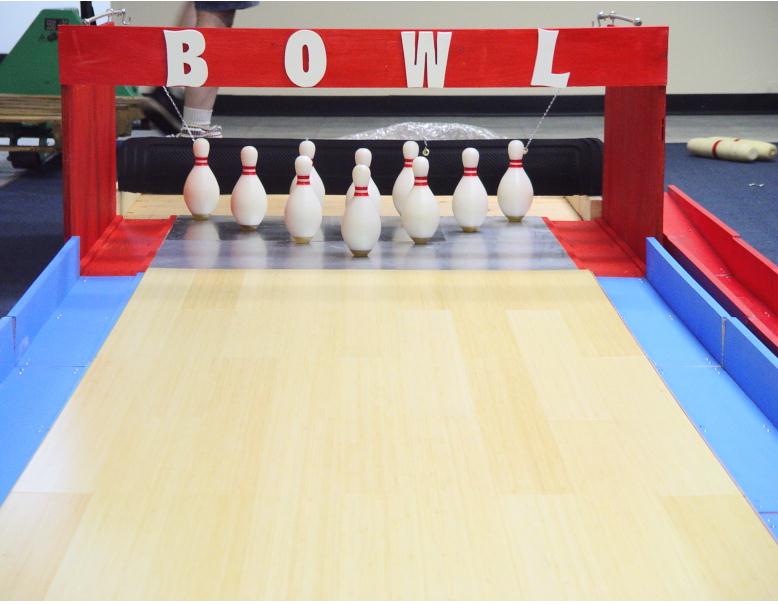
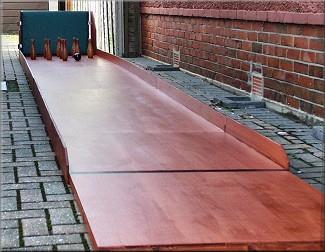
| Shown here: An example of a homemade bowling lane, 27 and a half feet in length, with gutters, ball return, laminate flooring lane surface, sidewalls, backstop, and pin deck |
BOWLING IS FUN.
Most definitely. The game brings out the kid in all of us. And while the term "bowling alley" might sound crude to the upper echelon, it's a wonderful place to go to share a good time with friends and relatives.
But what happens when the only bowling establishment around for miles closes down? All of a sudden, the nearest outlet for the game we enjoyed so much when we were growing up (and as adults) can potentially be 'too far to travel to'.
Because bowling is such a popular game, there are many folks across the globe who have solved the above feared problem, to a certain degree. They've done it by bringing bowling to the home. There are a number of resourceful individuals that have successfully built their own makeshift bowling lane(s) to be played in the basement or in the backyard. It's not as difficult as you might think to create your own bowling alley, depending on how much work you want to put into it.
The Internet is a great resource for determining just how to construct your own bowling lane. You can look at what other people have done, borrow the idea, and make your own customizations and improve- ments to fit your environment.
In a past edition of the North American Bowling News, we looked into the prospect of building your own backyard bocce court. Now it's time to take a look at the more conventional game, with balls and pins.
Small Ball Bowling lends itself well to this type of project. The website, www.whipcitybowl.com, is most informative and helpful for those interested in tackling such an undertaking. Like anything, the more thought and effort you put into your project, the more you'll get out of it.
The excerpt/'how-to guide' and photos that follow are from the owner of the Whipcity Bowladrome website, courtesy of http://www.whipcitybowl.com:
* * * * * * * * * *
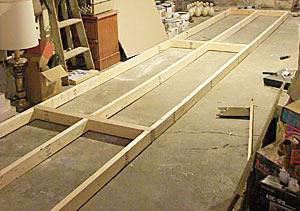
1. Bowling Alley Deck Frame Build
"I opted to build my lane to 30' long. My basement is 40' max, so this left some space behind the pins for a 'pit' area as well as a decent amount of room to stand in the 'approach' area from which to bowl. There's certainly no room for a 'real' approach where the bowler could take the usual steps prior to delivering the ball. In my scenario, one would simply roll the ball similar to the way one would when playing 'skee-ball'.
Standard "deck screws" seem to work best for assembly. Theyre inexpensive and are available in the long lengths needed to rigidly fasten the bowling alley deckframe together.
 |
| Photo courtesy Whipcity Bowladrome |
2. Bowling Alley Deck Frame Completion
Candlepin bowling alleys are between 41-42" wide not including the gutters. I opted to build mine at the low end of the tolerance and contructed it to 41" wide. Materials involved are nothing but basic 2x4 construction lumber similar to what is used as wall studs. I found it very good practice to check every board before buying it for straightness (duh). These initial stages are critical to getting the final results desireable and ensuring the lane will be fun to bowl on.
Also as most basements tend to be slightly humid, I though that unrolling a vinyl dropcloth beneath the entire length of the alley would help to stave off warping or help keep moisture from building up underneath the deck.
3. Deck Baseboard Installation
Part of the key to success here is ensuring the deck flexes as little as possible. I chose to use 3/4" thick plywood for the top surface. It's important to not skimp on this part or the impact of the bowling balls and pins will cause the deck to flex and everything to bounce, detracting from any sort of genuine feel to the game. Also be sure to make the alley crossmembers extend far enough out from the deck so there is something left to attach gutters to. Keeping it simple, rectangular shaped gutters are easy to build this way.
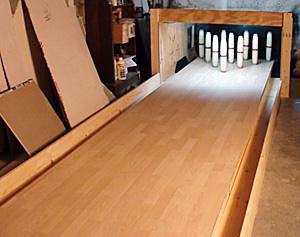
4. Bowling Lane Surface Assembly
Possibly the most expensive investment in the whole project will be the hardwood laminate flooring used for surfacing the entire bowling alley with. Laminate is available with a maple finish that very accurately emulates the surface of a real bowling alley. Expect to spend between $80-$150 on this part. In my case I did not begin building until I had purchased enough square footage of laminate to cover the entire alley.
 |
| Photo courtesy Whipcity Bowladrome |
Usually a few lengths of the laminate will have to be ripped in order to fit the width of the lane properly. This is best done on a table saw with a sharp carbide tipped finishing blade.
5. Bowling Lane Surface Completion
"Real" Candlepin alleys use a steel or HDPE pin deck for the end of the lane. I chose not to go that route as it would add expense to the project. It is an option one should consider when building a lane of their own. The laminate on this alley runs the entire length as shown in the photo.
Hardwood laminate is easy to assemble, however it generally is not anchored in any way when used as a flooring in a home. For the use of a bowling lane the surface needs to be secure. To do this "liquid nails" adhesive works wonders. A light bead on each panel prior to installation is all it takes followed by applying minor weight to the surface until the adhesive cures. Otherwise, assemble the laminate panels according to the manufacturer's instructions.
6. Kickback Walls, Backstop & Gutters
At this point, the bowling lane is really coming together. In my case, I had a hard time focusing on finishing since it was finished enough to actually bowl a game on without smashing out any basement windows.
The kickback walls consist of 3/4" thick plywood, 4' long x 30" high, held up by a 2x4 lumber frame with crossmembers for rigidity. Rubber backed area rugs hang doubled layered behind the box about 24" back from the end of the lane to stop balls and pins from hitting the concrete wall of the basement.
* * * * * * * * * *
NOTE: The procedure described on the prior pages is just one means of 'how to proceed' when attempting to build your own bowling lane. Certainly, there's not just one method.
 |
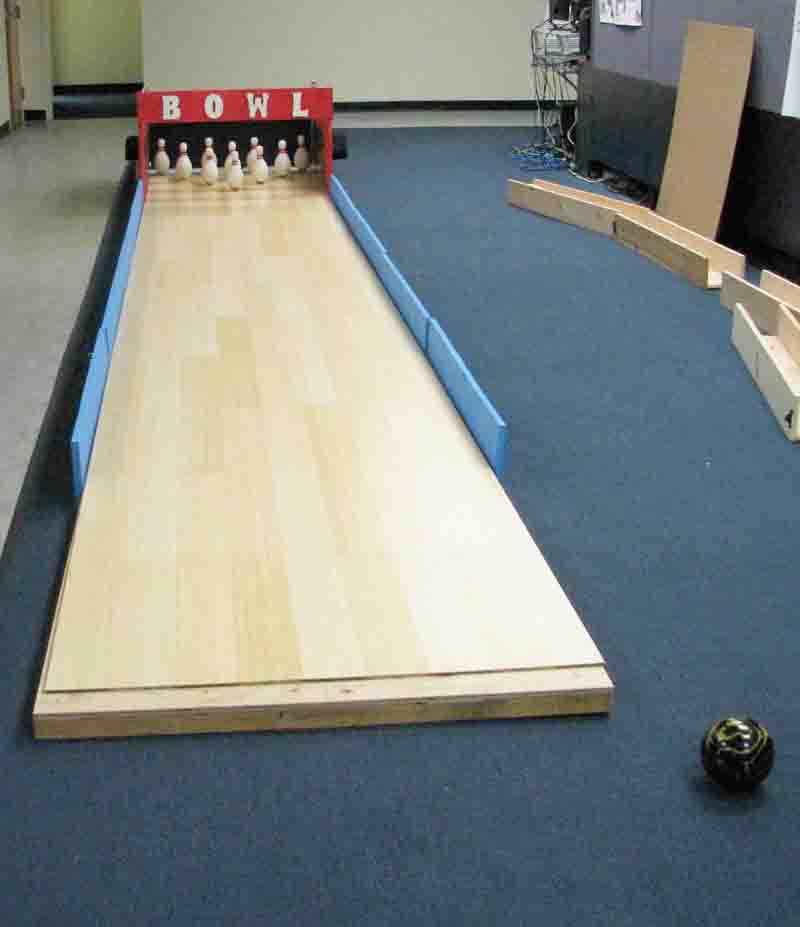
| A fivepin/tenpin pin deck |
Our contact from across the Canadian border, John Honeyford has hosted many parties/outings on his homemade, backyard bowling lane for quite a few years now, and has provided the small ball experience to many people in the comfort of his own home/backyard. Honeyford has enhanced his apparatus with the use of a real pindeck, which is extremely rugged (and heavy!). The unit is 24 feet in length, plus the pin deck. So much a hit is John's alley, with his guests that they'll defy the weather and set up picnic canopies over the alley, if rain starts coming down.
 |
| Jack Hertzog's extended, outdoor tenpin lane |
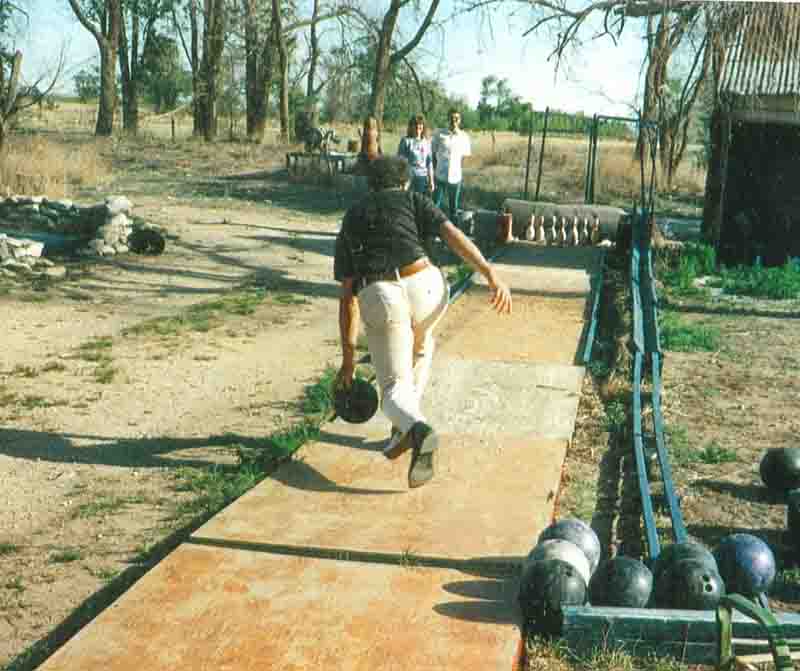
Another of the NABN's correspondents, Jack Hertzog, who resides in Roswell, New Mexico has constructed an outdoor lane that performs very comparably to a standard bowling lane, all things considered. With the additional space of an outdoor setting, Herzog also has extended his lane in length. Amazingly, his structure is durable enough to emulate the tenpin game, in addition to candlepins and duckpins. Herzog has shared his innovation with the public at nearby county fairs and has been using his structure for over 20 years. A job well done!
 |
| A Skittles Alley (Photo courtesy 'Mastersgames.com') |
The NABN's overseas main point of contact has also enlightened us with the specs on building one's own skittles alley. "Masters Games" is a successful English company that provides portable skittles lanes for rent or purchase to numerous local districts and community groups. The company specializes in customization to the customer's needs, and also provides various versions of the skittle pin and differing ball weights.
The design of the skittle pin is such that the pins don't fly, but pretty much stay grounded, like a conventional tenpin. As a result, you don't need very high sidewalls.
To test the feasibility of the 'do it yourself' project, the NABN made its own attempt at a small ball bowling lane, and is shown here. The lane is 27˝ feet in length (and also extendable), and regulation width, excluding the gutters. One of the major enhancements you might want to consider if you are building a lane for duckpins, is in adding rubber to the sidewalls that border the pin deck. When 1/2" pieces of gum rubber were added to each side of this lane's sideboards, the pin action was radically improved.
The unit has interchangeable gutters and rails—the rails are great for the youngsters, while the gutters enhance the overall bowling experience. Initially, the most difficult part of the construction process was in creating the housing that surrounds the pin area. The unit is durable and performs capably with the various small ball games, including duckpins, candlepins, fivepins, and skittles, but a tenpin ball might exert too much stress on the housing structure around the pins.
 |
| The NABN's version, but with rails, not gutters |
Laminate flooring was used for the lane surface, which is laid on top of a frame made of "2-x-4"s and plywood, and although this type of flooring is rugged, there still were instances of small dents on the laminate from airborne pins landing on it. The use of a piece of sheet metal nailed to the plywood foundation instead of extending the laminate flooring to the pindeck resolved this issue.
It should be noted that if you intend to build your own bowling lane, you should plan each phase of your project out, even to the point of drawing diagrams. Expect the project to take about 3 weeks, although a skilled carpenter can no doubt complete the job much sooner.
The homemade bowling lane will still require manually setting up pins by hand, unless a 'string-based' system is enlisted. But, pinboys were a part of the sport in the early days (and still are in South America), so a little labor is a small price to pay to ensure promise for the future.
Go Back or Close Window
(To execute a 'BACK' command after clicking on a photo to enlarge, right-click on a white area on the screen that follows, and then select 'Back' from the menu that will appear)
| If you like this article, give us a quick click on the 'Google +1', 'Facebook Like', and/or 'Twitter Follow' below | ||
| Follow @NABN2010 | ||